Re-celling an NiMh Battery
If you've come direct to this page, please read the safety warning first. Here are the details for fitting a new cellpack into a battery for the Lafree Twist range, but generic advice is included for other makes. Since batteries continuously develop, changing the cellpack often increases the capacity, in this case from 6.5 Ah to 8 Ah, increasing the range by 23%. The replacement used here was a pack from a battery for the Windsor and Salisbury bike models sold by Powacycle but the NiMh pack is no longer available.
Tools: Slim crosshead screwdriver, preferably Philips, Soldering iron, Electrical Solder.
Start by removing the pack from the Powacycle battery. Undo the four self tapping case screws, part the case halves and lift out the cellpack. Peel back the insulating card a little
Tools: Slim crosshead screwdriver, preferably Philips, Soldering iron, Electrical Solder.
Start by removing the pack from the Powacycle battery. Undo the four self tapping case screws, part the case halves and lift out the cellpack. Peel back the insulating card a little
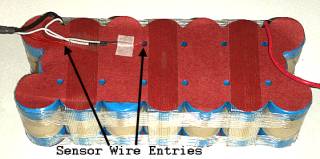
at the ends to reveal the terminations and unsolder the thick red and black wires, one at each end. Lift the tabs to avoid heating the cell walls. Now carefully lift the card insulation as needed and withdraw the temperature sensors. The wire entries are shown on the right. If necessary slit the card to gain access but take care not to short the ends of the cells together.
With the new cellpack ready for use, take the Giant battery and place it meter down on a flat surface. Undo the nine case screws completely. Now prise open and lift off the the upper case half and turn it to the side. Lift off the handle to avoid it accidentally shorting any cells and put it to one side. Then lift out the cellpack and peel away the insulating layers gently, cutting if necessary to reveal the connections and temperature sensors,
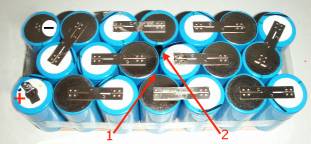
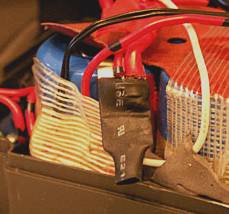
taking care not to break any wires or strips. Lift the wire pairs and sensors out from positions 1 and 2 shown at the right together with the sleeving that is also needed, then unsolder the red wires from the terminal shown with the +. The cell shown with the minus sign has already had it's terminal strip removed since it's an essential part of the battery meter circuit which
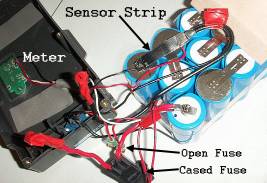
is needed on the new cellpack. You can see the long negative sensor strip in the upper photograph at the right which also shows the meter and two fuses. The red insulated free wire ends are only here due to removal of the other case half for clarity. For you they will stay connected. You can see that the sensor strip has thin red and black wires near the ends and these provide a differential for the meter circuit and must stay on as they are. To remove the complete sensor strip with it's connections, grasp it and start twisting it gently until the spot welds on the end of the cell (2)break, leaving the free end (1). With the old cellpack free, double wrap it in polythene bags to avoid any accident in the garbage stage and dispose of it. Now it's time to fit the new cellpack into the Twist battery case, so position it alongside the case with the White top cell positive terminal near to the pair of short red positive wires ready for soldering.
Lift the positive tab of the new pack up to protect the cell wall, then solder the pair of red positive wires to it. Slide the old insulated sleeve over it as shown, or insulate it with pvc insulating tape. Press the terminal back and flap the insulating binding over it. Open up the holes in the card if necessary, then insert the charge and discharge sensors and their associated plastic sleeving which ensures good thermal contact with the cells. Now clear out the thin rubber padding at the top of both casing halves to make room for the slightly thicker insulation on the new pack, then gently squeeze the pack into the lower case half.
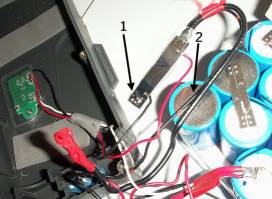
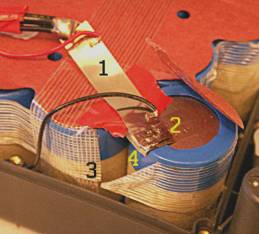
You'll have noticed that where the Giant battery had the terminations at one end, the new Powacycle one has one at each end. Fortunately, Giant have left enough length on the negative wire with sensor strip for that, doubtless to cope with supplies of both pack types. Slit the tape banding at (3) on the left, turn the cell terminal strip up and back over the top slightly as at (4). Tin both sides and solder sensor strip (1) to the terminal at (2). Add insulation over the adjacent cell as necessary and press down the terminal as shown, flapping down the insulating card.
You'll have noticed that where the Giant battery had the terminations at one end, the new Powacycle one has one at each end. Fortunately, Giant have left enough length on the negative wire with sensor strip for that, doubtless to cope with supplies of both pack types. Slit the tape banding at (3) on the left, turn the cell terminal strip up and back over the top slightly as at (4). Tin both sides and solder sensor strip (1) to the terminal at (2). Add insulation over the adjacent cell as necessary and press down the terminal as shown, flapping down the insulating card.
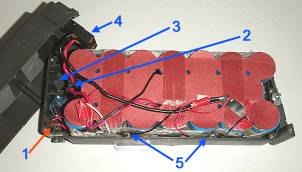
Now for the final assembly. Tuck the open fuse (1) into the corner recess, tuck the cased fuse (2) into the recess between the two end cells, then press the thin wires (5) at the side behind the screw posts so they don't foul the case screws as they are replaced. Replace the handle into the lower case half. Turn the upper case half, locate the terminal block (4) into it's recess (3) and press home the case, checking for trapped wires as you do it. Then
replace the nine case screws, but be careful not to overtighten them and pull out the threaded brass case inserts. When you first press the meter button, it will probably show all five lights, despite having hardly any charge. This is because the meter has no base point against which to measure until it's been charged once and then discharged. Fully charge the battery, then use it until it's well discharged, down to one light, static or flashing. To condition the electrolyte, use the battery for three more charge/discharge cycles and it will have attained it's full capacity and be ready for continuous usage at about 40% of a new battery's cost.
The principles in the above apply equally to other makes of NiMh battery. Basically, it's just the cell pack block of cells that get changed, and any sensors, additional terminal strips with measuring functions etc, must be transferred to the new cellpack, and all wiring connections and sensor positions remain the same as with the original cellpack.
The principles in the above apply equally to other makes of NiMh battery. Basically, it's just the cell pack block of cells that get changed, and any sensors, additional terminal strips with measuring functions etc, must be transferred to the new cellpack, and all wiring connections and sensor positions remain the same as with the original cellpack.
.