How these were photographed
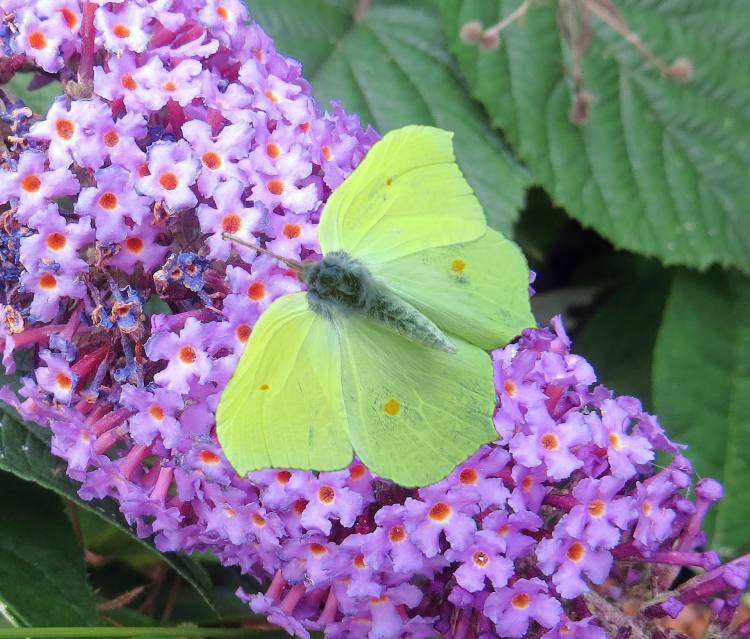
Brimstone butterflies like the one at the left are notoriously difficult to photograph with wings open, like the white butterflies they are very wary and always alert to any human approach. Apart from dead specimens, almost all online photos of these are of the closed wing side view. So how was this macro close-up achieved?
Back in 2004 and 2005 I carried out some experiments to find the learning and intelligence ability of various insects, and as part of that developed a way of capturing gatekeeper butterflies without any risk of damage. I had long noticed that most creatures don't fear camera lenses very close to them if the approach is gradual and includes retreats as well to get them accustomed. It was only a simple step to get the butterflies used to the fingers on the right of the camera being forward of the camera on some approaches, enabling the rear of the folded wings to be lightly grasped as you see
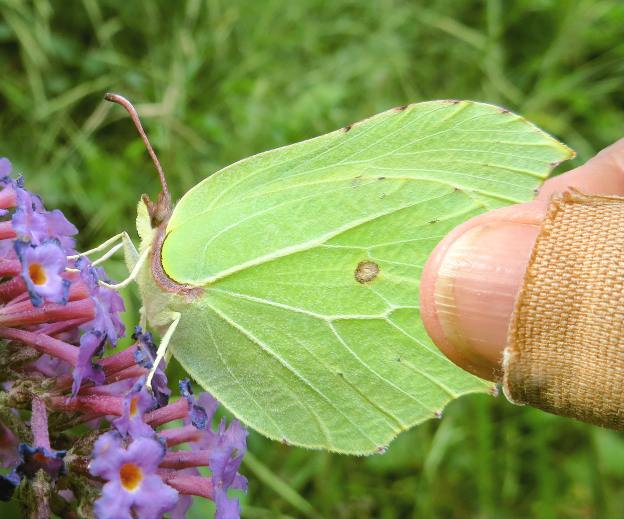
on the right. With brimstones like this one it's far more difficult to achieve and this was the first time of trying. After several failed attempts I discovered this one was just resting and not feeding, obviously satiated with nectar, and that made it more amenable to gradual camera approach for side view extreme close-ups, eventually with the lens barely an inch from the butterfly. So with it relaxed and reassured I was then easily able to grasp it's wings with my right hand. The plaster on my thumb wasn't connected, the insect hadn't attacked!
I've trained myself to operate my pocket Canon camera with either left or right hand alone, whether pocketing, switching on and off, changing into macro mode or adjusting exposure value. So with the insect held I took this left handed macro shot, then switched off and pocketed the camera. Part of my experiments with the gatekeepers included learning that when held by the legs, a butterfly flattens it's wings open to try to prise itself free, which was what was wanted in this case.

The gatekeeper butterfly has short legs and I used to push them lightly down onto my forefinger and grasp the legs either side with thumb and adjacent finger, but I found the brimstone's long legs enabled me to simply hold the leg tips between thumb and forefinger as here, the wings then predictably opening flat.
As an essential part of the gatekeeper experiments I learned that very gently stroking the soft hair on the body from front to rear calmed them and there were strong indications that they liked that. The gatekeeper hair is short and even rather like that of a short haired cat, but the brimstone's is more variable and tufted. However, it did respond and relax, though one oddity was the way it held it's antennae close together as one, something the gatekeepers didn't do. After a period of stroking I nestled the brimstone into the flowers of a buddleia head, supporting the plant underneath to enable me to get the insect into place without wrecking the flowers too much. More stroking then to ensure it was relaxed in it's new position, and when I was sure it was I got my camera out of my pocket and
set it up for right hand macro shots after tidying the flowers ahead of the butterfly where I'd parted them to slide it in place. Framed and focused on screen, I released the brimstone's legs and slid my fingers out, taking a shot as I did so and then helped with my left hand as well, a second shot. Just as well, since the buddleia shake after the release spoiled the first shot. The gatekeepers when legs were released after stroking would stay put on my forefinger for up to half a minute before flying and then go to the nearest flower to resume feeding. Not with the brimstone. Just after the second shot it realised it was free, got it's footing on the flower head and took off into the distance. Clearly it's wary nature takes precedence over any comforting or hypnotic effect of being stroked.
The factor that made a digital camera so poor for this kind of shot was lack of the instantly available shooting ability to snatch the brief moments when this butterfly's wings are open, something very much easier with a film camera.
Digital cameras are in truth very poor, unable to cope with a wide variety of photographic needs, so special steps have to be taken to achieve what film cameras were easily capable of. For more on digital's shortcomings, see this article at the foot of the page, but meanwhile some of the compensating measures are explained below.
Digital Camera Shortcomings
The overwhelming reasons for the almost complete takeover of photography by digital cameras has been the absence of film and processing inconveniences delays and costs, plus the ability to preview results immediately on screen, but the losses we've suffered in consequence have been numerous and substantial.
First is the sheer slowness of digital, the need to switch on before taking a shot and then the often slow reaction to pressing the shutter. In contrast a film camera was always ready for an opportunity, the ability to just press the button and get an instant photograph was invaluable, especially in wildlife and sport photography.
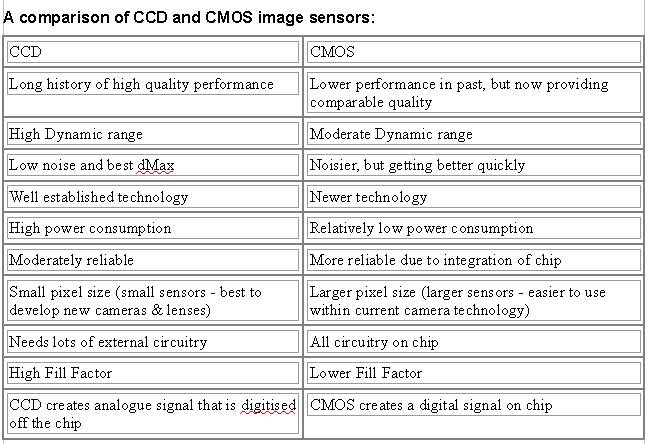
The dynamic range of digital sensors, that is the ability to handle extremes of light and dark in a scene at the same time, can be very good with digital. In practice though, the compromises made in consumer camera design mean that ability is often limited, so shots taken with high lighting contrasts often result in photos with large areas of completely black or white with no detail in them. There are two types of sensor in use, CCD and CMOS. CCD was once universal but is costly and more difficult to use, so consumer cameras have been increasingly switched to use CMOS. Below is a chart showing the main differences for camera manufacturing, marketing and performance.
You can see easily the attractions of CMOS for makers of consumer cameras, better reliability, easy for them to use, power consumption low so giving customers more shots per battery charge, and integration of the image digitisation process meaning lower manufacturing costs.
But as you also see, that has a cost in performance, less dynamic range, and more electronic noise meaning worse performance in both poor light and high contrast situations. Those easier to use large pixels also have a cost, less fine detail is resolved in images. Of course these will improve over time and doubtless makers will be very happy to sell us each new improved camera in turn as it arrives!
Of course the sensor in film cameras is the film itself, so merely changing the film to a different type for the purpose in hand set up a film camera for the best sensing results in ways that digital cameras cannot completely simulate.
Another disadvantage of digital when compared to film is the way in each work to record light intensities. The human eye and film are both logarithmic in the way they operate, so a colour slide can be viewed directly with it's image as natural as the original scene. The electronic sensors in digital cameras have linear sensitivity, so the image light is contained in a vary narrow band of dark to light, looking dark grey overall. This means the camera's electronics have to "stretch" the dynamic range to make the photograph look normal to the eye, more opportunity for image errors.
And then there's those batteries. Cameras using consumable throwaway batteries can be very expensive to run, while the rechargeable batteries most cameras use don't take as many images and have an uncanny ability to run out just at the most inconvenient possible moment, often meaning losing a vital shot.
There's a photographic knowledge cost to digital cameras too. In the film camera days most bought cameras that were just "point and shoot" giving good enough results for general snapping, but their limitations prompted many to move on to better cameras which needed to be operated correctly for better results. In consequence they learned such things as the relationship of shutter speed and lens aperture in setting the depth of field, and the value of the out of focus backgrounds that could be achieved. Almost all digital cameras have some of the better film camera facilities but also have an auto setting that looks after everything, focus, shutter speed, aperture and sensitivity, making them effectively "point and shoot" for the majority. Most are therefore used in that automatic mode, but that has some real limitations which means they cope less well in auto mode with photos outside of general snapping.
Unfortunately it's when those who want to do more and better that many consumer digital cameras fall down. They often don't have full control of shutter speed and aperture and often have no manual focussing ability at all. And such facilities they do have are usually accessed via complex slow-to-use menus or tiny fiddly dials or buttons. This can be so offputting that many don't bother to try any more so never learn through practice how to get optimum results. The best way to overcome this difficulty is to buy a camera based on the ease of use of it's controls and menus, with the key control elements like mode and exposure value controlled by easy to operate dials or buttons. As well as Auto, there can be semi-automatic modes that leave the photographer control over some of the most important functions and it's well worth practicing using these with experimental shots to learn what can be achieved.
But despite all the objections I do use digital cameras! This is mainly because my photos are intended for website use and digital camera output is basically ready for that purpose. Film photos in contrast have to be scanned to produce files suitable for computers and the web, which can introduce unsatisfactory artefacts and dust problems. Digital photographs also have the advantage of a much greater control over the final image quality through the ability to process the image file in a photo editor, and that can offset many of the shortfalls of digital cameras
.
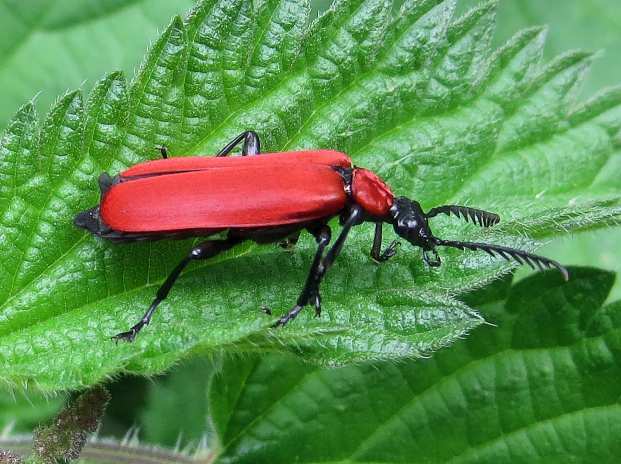
The insect on the left is a cardinal beetle, it's distinctive colour likened to a cardinal's robes to give it this name. Beetles in flight can be spectacular due to their extended elytra (wing cases) held straight out to allow the wings to beat just behind them.
I thought this one's bright red wing cases would make an ideal shot in flight against a green grass background, but for this a consumer digital camera is hopeless. Even if such a chance of a shot cropped up, switching on the camera and shooting would get a snap long after the beetle had passed.
But as you see below, I did get the shot on the day I decided to get it, so how was that achieved?
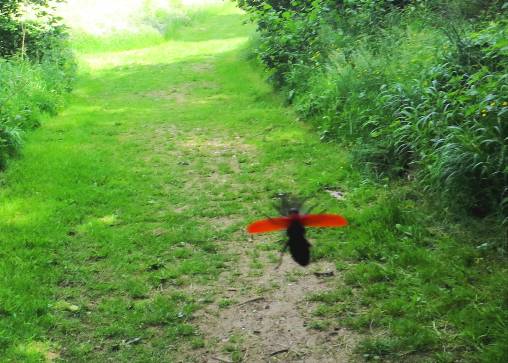
Like many beetles they are quite placid, so at a time when the cardinal beetles were out in good numbers, I chose a large speciman and picked it up, holding it in my closed left hand. Just yards away there was this suitable path with good lighting, so I drew out my pocket Canon camera and set it's controls with my right hand to manual focus of around 30 cm to give a reasonable depth of field sharpness to cover the scene too.
Then facing the light in the field ahead and with the camera in my right hand and a finger ready on the shutter button, I opened my left hand with fingers forward and up slightly at the ends. The beetle did as expected, walking to the high point at the finger tips before launching into flight, at which point I pressed the button, getting this in flight shot.
It included the ends of my fingers at the foot of the frame, but trimming the photo in the computer's photo editor got rid of those. The vivid translucent wing cases have caught the light well, showing the insect's legs beneath through them, whilst the very rapidly beating wings just behind the wing cases have blurred into near invisibility. Beetles are such clumsy fliers compared to other insects, their ungainly movement though the air is slow and sometimes even noisy, and as you see, they often don't even fold their legs neatly in flight, here splayed out in all directions.